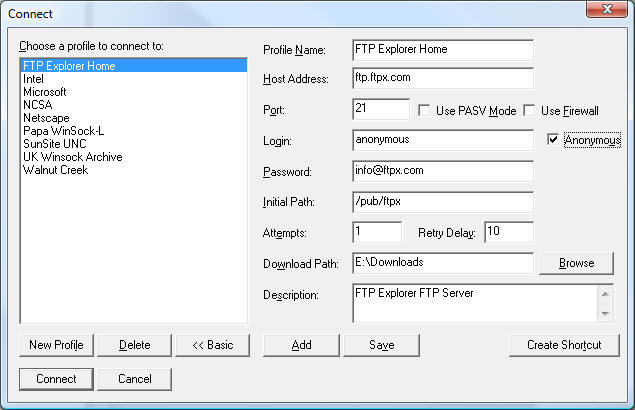
This dialog contains fields for all necessary information to make a connection to a remote server with FTP Explorer. The program comes with several default options for immediate use, but the process of making connections of your own is relatively simple with the proper information. The process of creating connections is explained in detail below, but a quick look at the Option Configuration Dialog may be necessary at some point to clarify the "Anonymous" and "Attempts / Retry Delay" options.
The text displayed in this field can either be the profile name that is selected in the list on the left side of the dialog, or it can be text that has just been entered. Click on an entry in the list to choose the profile and automatically display the related connection information for it. Any relevant data previously configured in the connection dialog for each server will be displayed after its selection from the list.
To edit an existing Profile Name, simply select the profile to edit from the list, then move the cursor to the point in the profile name that you wish to change, and make the desired changes. Any changes will automatically be saved unless the �Cancel� button is chosen. Use the Save button to retain any changes if you intend to close the dialog using the �Cancel� option. All standard Windows edit options including Copy, Cut, and Paste are available when editing this field. Profile Name entries can contain spaces, and other characters, but must be smaller than 25 characters in length.
The Host Address field contains the location of the FTP server to which the FTP Explorer is to connect when this Profile Name is selected. In the example above, the location is described by its DNS entry. The location may also be specified by its IP address.
The Port option is set to 21 by default, but may be changed for any profile at any time. Most servers accept ftp connection requests on port 21, but there are those that do not for security, or other reasons. Change the port number by clearing the default entry, and typing the new port number. You can use the Save button to save any changes, or simply select a different Profile from the list to update the setting. You must use the �Save� button to retain any changes if you close the dialog with the �Cancel� button.
PASV mode is useful for certain types of firewalls that do not allow FTP servers to initiate data connections back to the connected client.
If this option is selected, the firewall configuration parameters from the Firewall tab of the Options Dialog will be used when initiating a connection to this profile.
The login name that is required by the selected server to access your FTP account goes in this field. If you do not have an account with the selected server, and it accepts anonymous FTP requests, enter �anonymous� in this field, or enable the Anonymous option (explained below).
Enter the password in this field that is required by the server to access your FTP account. The password entered here will not be legible for security purposes. If the connection to a server is refused, it is a good idea to re-enter the password to make sure it wasn't entered incorrectly. If you are configuring a profile for a server that requires an anonymous login, you can enable the Anonymous option to automate the entry of the password. See the Anonymous option for more details.
Enter the path on the server that you wish to start in when using the current profile. This feature makes it quick and easy to automate the navigation to a commonly visited directory on the server. For example: In the example above, when the connection is made to ftpx.com, the directory in which the first listing will be made is the "/pub/ftpx/" directory. If the Initial path field does not contain a value, the root directory will be the default listing. FTP Explorer provides a handy feature that can �Remember� any directory that you specify, and add it to the initial path section of the server profile. See the �Remember� feature described in the Tools Menu for more details.
Use these options to allow FTP Explorer to automatically retry the connection if the initial attempt fails. The "Attempts" field contains the maximum number of attempts that the program will try before returning an error. The "Retry Delay" option instructs the program how long to wait between connection attempts.
Note: If the value contained in the "Retry Delay" field is larger than the connection time-out value of your Winsock configuration, the delay will not be effective, although the �Attempts� value will be. The value of the "Retry Delay" field is only effective if the value is smaller than the Winsock time-out value.
Use this field to enter a default path for all downloads from this server. If you do not enter a path in this field, the default download path will be used for all download operations (not download - to operations). Use the Browse button to locate the chosen directory.
Enter a description for the server in this field. An entry in this field is not required for any profile.
Use this option to fill in the Login and Password fields with "Anonymous" and the value contained in the Email Address field on the General tab of the Option Configuration Dialog (an email address is customary for anonymous connections).
Use this button to create a new server profile. All of the information necessary for the connection must be added to the new profile before a connection can be made to the server.
The Save button is provided for those instances when you want to change a profile, then �Cancel� the dialog (useful when you are connected and want to stay that way). If you �Connect� or change to a different profile, changes are saved automatically.
Use the Shortcut button to create an Internet shortcut to the selected server on the desktop of your machine. When a shortcut is opened on the desktop, FTP Explorer will automatically launch and attempt to connect to the server addressed in the shortcut profile.
The Remove button deletes the current profile from the system registry and the profile list of the program. There is no "Undo" command for removal of profiles, so care should be taken when removing a profile.
If this feature is enabled, FTP Explorer will save all directory information about the site on the local machine, so you can disconnect and browse the site locally. FTP Explorer will automatically re-connect to carry out any user-initiated file transfers. This allows users on pay-per-hour connections to save considerable time perusing directory structures on-line. The cached data for each profile is kept in a file called ~profile name~.DAT which is located in the program directory. These files can be deleted as necessary with no ill effects. After a profile�s cached data has been deleted, you must connect to the server to create a new .DAT file for the profile before you can browse the site off-line.